The product inside of a mock cup holder
Over the summer, I took a course called ENGR 407 – Inclusive Design. The course is based off of the Inclusive Design principles developed by Microsoft.
One of the main objectives of the course was to create a product for an individual with a spinal cord injury. I headed a group that developed the “dog leash door opener”, a semi-automatic device designed to open kitchen cupboard doors while fitting into the cup holder of a wheelchair. It turns out that the client is still using our solution!
Overview of Inclusive Design
The Project Description
The primary deliverable for the course was simple: form a group and design a product that can help an individual with a C5/C6 spinal cord injury access the contents in their kitchen that are located behind cupboard doors. Very broadly, someone with a C5/C6 spinal cord injury must use a wheelchair and has partial, but weakened, use of their arms.
The primary problem the client was experiencing was that while they could open the cupboard door (granted it was not too high up), the door would collide with their wheelchair.
All teams had a budget of 100 CAD and a time limit of 5 weeks to come up with a final product, introducing some unique constraints.
Our Design Process
In this project, the design process can be outlined as follows:
- Create the project background (including the details of the client’s condition)
- Describe the significance of a solution (primarily that the client stands to benefit from an easier experience opening doors)
- Identify the gaps (or mismatches) in the client’s current kitchen setup in accordance with the guidelines provided by Microsoft’s Inclusive Design principles
- Formally define the project requirements (objectives and constraints)
- Perform an existing solution analysis
- Create several prototype ideas
- Create a Request for Proposal (RFP) document that outlines the prior steps. Based on the above information, create weighted matrices that help guide the team towards which prototype idea is best
- Create and iterate on the prototype, periodically asking the client for feedback
- Summarize the findings in the Final Report, present the product, and provide the product to the client
Points of note during this design process include that despite our group being composed primarily of electrical engineering students, we opted towards a purely mechanical solution due to time, financial, and technical constraints. One point that I particularly stressed was the usability of the product on many doors, not just one. This philosophy guided the group towards our final product.
The Product
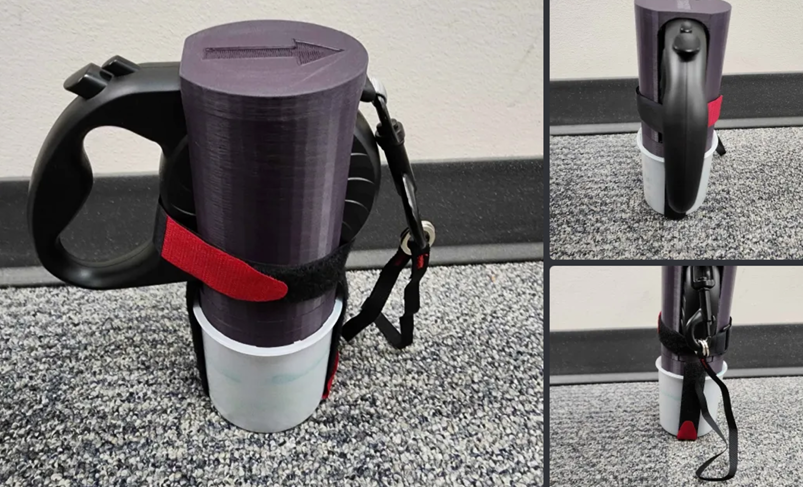

The product inside of a mock cup holder (left) and a GIF of the structure of the product (right)
The product our team landed upon can best be described as a dog leash water bottle door opener (try saying that five times fast) that uses the loop of the leash to hook on to door handles or adhesive hooks. Once the leash is hooked to the door, the client reverses the wheelchair to a desired leash length, locks the leash, then reverses further. The tension in the leash opens the door.
Designed specifically to fit the water bottle holder of the client’s wheelchair, the product is composed of the following: a commercially-available retractable dog leash chosen to best fit the client’s needs (notably the buttons are easy to press, an important factor due to the client’s limited hand dexterity) which is strapped in to the 3D-printed body (the purple cylinder). The body has an arrow at its top to indicate the direction which the dog leash should be inserted. The body is also composed of several parts to facilitate fabrication.
Once the leash is secured into the body, the product can be put inside of the client’s wheelchair water bottle holder. Note that for safety this also needs to be strapped in using the provided Velcro strap (to prevent the Product from flying out), which may be difficult for the client to do on their own, requiring a small amount of co-dependence when using the product. One of the areas of improvement for the product is creating a better securing mechanism.
The primary benefit of this product is that it can be used on most outwards-opening doors, not just kitchen cabinets, provided the door is not too heavy. Many doors do not require any special modification, with the leash loop simply going around the door handle. For doors with an incompatible handle type or position, an adhesive or drilled hook is required to ensure compatibility, which was another design element that needed to be considered to ensure optimal use.

The use of the adhesive/drill hook in the operation of the product
My Contributions to the Project
Gavin, another team member, was instrumental in creating the 3D model in SolidWorks and working with the university’s Makerspace to 3D print the model.
The other team members helped in refining the prototype, composition of the written deliverables, and participating in performing the final presentation.
Conclusion
Ultimately, we were able to produce a functional product, finished on time and significantly under budget, only costing roughly 40 of the 100 CAD budget allotted. This was a huge win for us, proving that a simple design does not necessarily mean a bad design.
A few weeks after finishing the course and providing the product to the client, I was pleased to hear from the course professor that our product was still in active use by the client, as opposed to the alternative solutions made by other groups in the class.
This project (and course) taught me a lot about how Inclusive Design is not just about making products that work for one small subset of the population; it showed me that our product can also be used for any wheelchair user, perhaps even with greater ease than that with the client since many wheelchair users also have full use of their arms. This directly coincides with Microsoft’s 3rd tenet of Inclusive Design: design for one, extend to many.
I look forward to engaging in further projects leveraging the invaluable knowledge gained from this course, and encourage designers to consider Microsoft’s Inclusive Design principles in the product development process.